Sewing Cross Stitch
Cross stitch is a decorative sewing stitch and can be used for pictures, cushion fronts, personalised cards or gift tags with many possibilities in between as well.
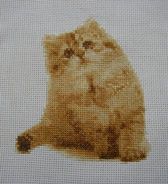
This craft can be used to show your particular interest or hobby by making cross stitch items in hobbies that you enjoy.
This may be a loved flower from the garden, a picture of a pet as a reminder, a scene from a holiday and many, many more.
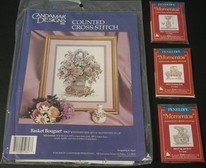
There are many ready made kits available, like those shown in the picture, in lots of different sizes and prices to suit everyone.
Cross stitch can also be done without kits.
This craft can be done anywhere and is a good relaxation hobby as all that is being done is sewing crosses on a canvas by following a picture.
Items needed to begin a cross stitch pattern or picture.
Fabric.
The fabric used in cross stitch is called Aida. Another name for this is Jute canvas.
This fabric is made from cotton and is an example of an open, even weaved fabric as it has a natural mesh look and quite a firm feel.
The Aida cloth comes in different sizes or counts and is made with varying hole sizes where the wool will be sewn through. The formation of the holes will make the fabric look like it is in squares with one hole at each corner, these are known as blocks.
The size of the picture is determined by the size of the blocks, otherwise known as thread counts, in the material. higher the count number the finer the fabric will be.
The size used in most cross stitch projects is 14 count as it is easier to see the holes.
The Aida fabric used comes in different colours although cream, white or ecru are the most popular colours.
Another type of fabric that is used is Even weave fabric. Again the weave has a specific number of threads to the inch (2.5 cms).
Smaller pictures = finer material = more threads
Larger pictures = large weave = less threads
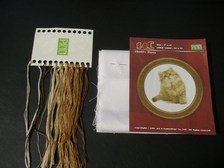
Threads.

The thread used in cross stitch is called stranded cotton or silks.
Each colour and shade of each colour has a different number.
This will make sure the right colour is bought if the first one runs out.
This will give continuity to any work done.

The thread used in cross stitch is called stranded cotton or silk hanks.
Each colour and shade of each colour has a different number. This will make sure the right colour is bought if the first one runs out.
The thread in these hanks are quite thick and are made from six finer threads. The number of threads usually needed in cross stitch is two. This means that a length needs to be cut and then two strands pulled out of the six.
It isn't as hard as it sounds as the threads come away quite easy.
Needles.
The needles used in cross stitch are made to have a blunt tip and a relative large hole for the threads. They are the same ones used for tapestry.
The needles have to be blunt so they can be pushed through the weave and not end up breaking through the threads.
Accessories
There are a few accessories that will help with cross stitch.
These are small sharp scissors
A fabric roll, cardboard with holes cut out or container to store the threads neatly so they don't get all tangled up.
A magnetic board (shown below) to hold the pattern is one that I have use and really like. This keeps the pattern in place and has smaller magnetic strips that can be use to show where the sewing point is. Especially good if stopping halfway through a colour.

Exploring cross stitch kits.
These kits provide all the materials, such as Aida fabric slightly bigger than the amount needed, threads and needle.
These are needed to complete the picture on the front of the kit.
They are usually called counted cross stitch where a block is made up of four holes and it is these blocks that are counted so that the picture can be place onto the fabric.
Beginning the cross stitch steps.
Hemming the edges
The Aida fabric has a tendency to fray so the first step is to make a narrow hem around all sides of the fabric.
The Aida fabric can be stretched over a hoop or a frame this is to keep it tight while being sewn to keep the stitches even.
Marking a centre.
When there is a piece of fabric to stitch a pattern or picture onto, a centre point needs to be obtained so there is enough space given to complete the project. Starting too far over to the left or right may result in not getting all the threads worked.
To get the centre mark iron the fabric folding side to side and then top to bottom making sure there is a crease showing.
With contrasting thread (sewing thread can be used) do a running stitch along the crease both ways, where they meet will be the middle and the start of the cross stitch.
A centre line will need to be drawn onto the pattern as well. The pattern usually marks the centre with a dark arrow head at the sides and by drawing a line it makes it easier to count the blocks.
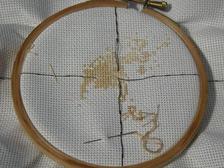
Beginning the stitches.

The centre line has been marked out with the black lines and the cream arrow shows the centre of the work. This will match the fabric and running stitch lines.
The individual stitch is sewn across a square of four holes which on Aida is one block (top right black square with arrow in picture).
Cream oval shows a group of four blocks.
The first stitch goes across from top right to bottom left or top left to bottom right depending on which way suits you, (bottom right square cream line and writing).
The next stitch goes in the opposite way so a cross is formed, (bottom right square black line and writing).
**It doesn't matter which way you sew your crosses but you need to make sure that all the stitches that are on the top are facing the same way as this will make the finished picture look better.**
Counting the blocks and sewing.
Starting at the centre and looking at the pattern to see what colour to use sew the first block.
Sew the first cross and then count the blocks to sew another cross in the same colour, this could be in either direction and now is when the running stitch comes into play by acting as a guide.
By doing a lot of stitches with the same thread will give a stronger base than cutting the threads so there are millions of loose ends which could result in the stitching coming apart.
This is quite a large subject to cover and there is an Amazon link , for more books, kits for cushions or pictures, on the shopping page.
I hope you enjoy doing this stitching as much as I do. The finished item is well worth the time it
takes to complete.
Return from Cross Stitch to Chair Cushion Covers
Affiliate offers
Please take care with any soft furnishing that it does not come into contact with any heat source.
If you have found an error on this page or want some more information on sewing cushions.
Please contact me . Thank you
New! Comments
Have your say about what you just read! Leave me a comment in the box below.