Sewing a
Patchwork Cushion Cover

A patchwork cushion cover is a great introduction to simple patchwork. This can be just as effective and will look just as wonderful as the more complicated patterns. When people think of patchwork they usually visualise all these wonderful designs on cushions or quilts.
Starting with a basic design first will give you the confidence to try a more complicated one later. There are many different designs like the Sail Boat, Ohio Star, Dutchman's Puzzle, Roman Pin Wheel. All you need to do is take your time when sewing. I have unpicked more seams than I care to remember to get everything looking right.
The designs that you choose can be ones you have made up yourself or some of the more well known ones like the Log Cabin design that have been used for years.
Any patchwork pattern begins with shapes in squares, rectangles, triangles, hexagons, pentagons to name just a few. These provide the basis of a lot of the design blocks.
Care should be taken when cutting out to make sure that all the squares are the same size so all the seams will match up at the end.
The straight edges can be sewn by machine and is great if the area is large. Smaller items or areas that a machine would struggle to get to can be sewn by hand.
When choosing the material for your cover it is best to get 100% cotton. If you are using odd scraps of fabric then they all need to be about the same weight and can be washed in the same way.
The Range have a good selection of small pieces of fabric perfect for patchwork.
If you are not sure about making your own templates for patchwork then you can buy these as well as many good books to help you learn patchwork and different designs.
Making a patchwork cushion cover
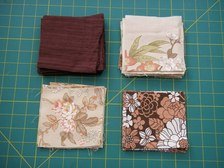
Decide what shape, size and how many different types of material you will be using. I decided on 4 inch squares and used 4 different types of material.
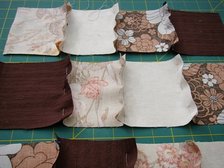
Arrange the squares into the pattern that you want. Pin and then sew the
squares together making strips. I ended up with 4 strips of squares. The width of the seam allowance is a matter of choice however the same width should be used throughout so the seams will match up when sewn together.
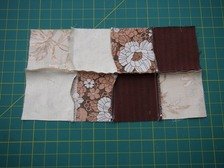
Arrange the strips of squares to form your pattern and sew the strips together.
When all the strips have been sewn together, the front of the cushion cover has been completed.
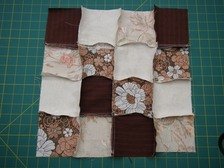
The same steps can be done for the back of the cushion. I used a plain brown backing, made from one of the material I used for one of the squares. The back could also be made from a contrasting colour as an alternative.
Choose
colours that blend in well with each other and/or match your
surroundings. The ones I have chosen above do have a vague brown theme
running between them but I picked these to show the patchwork pattern. For an eye catching design use random colours.
Enjoy making up your own ideas for your patchwork cushion cover.
Return from Patchwork Cushion Cover to What is Patchwork
Affiliate offers
Please take care with any soft furnishing that it does not come into contact with any heat source.
If you have found an error on this page or want some more information on sewing cushions.
Please contact me . Thank you