How to Increase in Knitting

How to increase in knitting will be another step to master after you have learned how to cast on knitting and mastering the knit and purl stitch.
If you are making a knitted square or a garment then you will need to know how to increase and how to decrease the knitting stitches.
These will appear in knitting patterns and will be abbreviated to "inc" or "M1".
The pattern will state how to m1 in knitting the item and the instructions are usually under the abbreviation section.
These increases are usually done on a knit row, but if the increase is done after a certain amount of rows then the increase may fall on a purl row and the increase is made in the same way but purl wise.
How to increase in knitting - Video
How to increase in Knitting - The Steps
Increasing Stitches
When knitting a sleeve of a garment or knitting squares for blankets diagonally. The stitches need to be increased on alternate rows until the required number of stitches have been reached.
In some patterns there will be an increase row when doing the last row of rib at bottom of a garment or sleeve.
This will make sure that there is enough stitches to complete the pattern and the increases may occur right along the row.
This could also be needed if you are learning how to cable in knitting. This is to ensure that the right amount of stitches are there to do the intricate patterns.
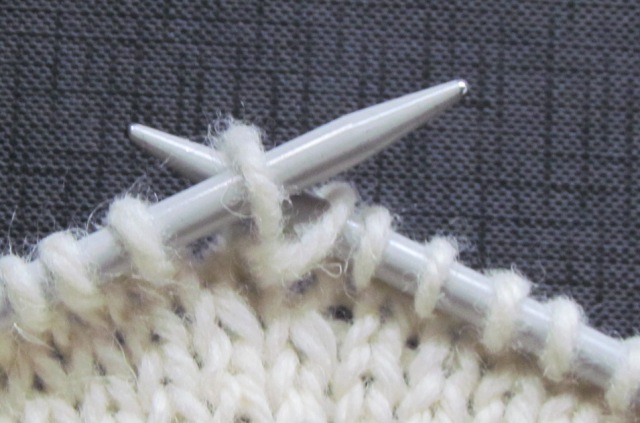
Step 1 - Knit to the increase point

Begin the increase stitch as if a knit stitch was going to be done. The increase can be done at the start, middle or end of a row.
Insert the needle into the loop on the first stitch, wrapping the wool between the needle holding the stitches and the other needle going through the loop.
If a knit stitch was going to be knitted, the stitch would be taken off the needle. BUT when increasing this doesn't happen.
The point of the needle that has just done the knit stitch is then eased around behind the first needle and the tip is placed into the back of the stitch. Wrap the wool around as if a knit stitch is going to be done.

Bring the tip of the knitting needle in front of the needle holding the stitches to catch the loop. Finish the stitch by taking the first needle out of the stitch.

When looking at the knit side of stocking stitch the increased stitch can be seen because it looks like there is a bump at the bottom of the stitch.
Another way to increase knitting stitches
The pattern may ask that the increase is done by picking up the loop between the two stitches and knitting into it to make an extra stitch.
Picking up the loop between the two stitches.

When increasing stitches by picking up the loop between the stitches, the loop can be found at the base of the stitches.
The area is highlighted by the oval

The loop between the stitch has to be picked up and knitted this can be done with or without placing it onto the needle.
It depends on how confident you are about knitting.

When placing the picked up loop onto the needle, it is then knitting in the usual way and can be done either knit wise or purl wise.
Knit wise is probably an easier way to increase the stitches.

Once the stitch is knitting and the number of stitches increased then the stitch is taken off the needle.

When increasing knitting stitches by this method a hole can appear in the knitting.
This is because the loop between the two stitches brings the stitches together and this method lifts the loop higher therefore creating a hole.
This can be incorporated into a pattern or if it is just after the rib knitting then it shouldn't matter.
The only way it would matter is if it is in the middle of the row.

Another way of knitting this loop when it is on the needle is to knit into the back of the extra stitch.
This twists the yarn or wool slightly and closes the gap.

After knitting into the back of the loop the stitch is the taken off the knitting needle as usual.
How the knitting looks when increasing stitches

In the picture above above there are three ways on increasing knitting stitches.
The oval - shows how the increased stitch looks on the finished item after knitting into the back of an ordinary knit stitch after the knit stitch has been done but not taken off the needle.
The square - shows the increased stitch when the loop is picked up between the stitches and the hole it can create.
The arrows - show the increased stitch when the loop is picked up and then knitted into the back of the stitch. It gives a bobble like the first way and the hole isn't as big as the second way.
Practise, find the way you prefer to increase stitches, enjoy discovering this craft and don't get tangled up in the knitting needles and wool.
There are many outlets both online and in shops that have a wide variety of wool or yarn. Despite the name My fabrics UK does have a knitting and crochet section for all your knitting needs.
- Home
- Knitting for Beginners
- How to Increase in Knitting
Affiliate offers
Please take care with any soft furnishing that it does not come into contact with any heat source.
If you have found an error on this page or want some more information on sewing cushions.
Please contact me . Thank you