Making Bolster Covers
and Cushion Pads
The steps to making bolster covers and bolster cushions are very nearly the same. Traditionally bolster cushions were cylindrical in shape but they can also be rectangular which may help in the sewing of them. All that is different is an extra seam. Instead of making the body in one continuous piece of fabric, two halves would be needed instead.
Making Bolster Covers
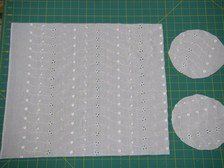
Decide on how long and wide it is going to be and make your pattern
accordingly. You will need one continuous piece (for round) or two half pieces (for rectangular) for the body and two
rounded pieces for the ends. Make sure to allow an extra 2cms (3/4 in)
for seam allowance on the ends and if using two halves of material.
Step 1
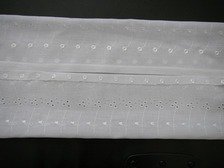
Pin the pattern on the wrong side of the material and cut out.
- If using one piece of fabric, take the main piece, place right sides together, mark a section where the fastening will go and sew either side of the gap within the seam.
- If using two half pieces of fabric sew one seam leaving a gap to insert the fastening
The type of fastening can be put in at this stage before the ends are sewn in place. This allows access if using a machine for a zip, velcro or buttonholes. If using tie or ribbon fastenings these can be put in place later when cover is finished.
After the fastening is in place the second seam can be sewn if using two halves.
Open the fastening half way to make it easier to turn the cover through if using a zip.
Step 2
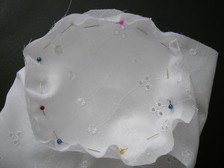
Keeping the cover wrong side out, take the rounded ends and place right sides together with the ends of the main piece, some easing into place may be required. Sew in place.
Turn right side out, through open gap or fastening.
Attach tie or ribbon fastening if needed. Place cushion pad inside opening.
Making Bolster Cushion Pads
The steps are very much the same if this is to be a bolster pad. After sewing seam(s), leaving the gap, and sewing the ends. Turn right side out and then the filling of your choice would be put in.
The gap would then to machined or top stitched closed.
Different Finishing Touches
The ends of these cushion covers can be altered to give different looks
- Include piping between the seams. This would then be stitched to the right side of the fabric after before 2 before the ends were sewn in place or at the same time as the sewing of the ends.
- Have the ends tied with ribbon. Make sure if the ends are to be tied
then make the body longer in length, neaten the edges or finish off the
ends of the material to be tied as this would still be seen. Place inner
pad inside the cover and then either tie the ends of the material
itself or use cord or ribbon.
- Sometimes the ends can be gathered and then finished off by placing a button over the middle.This is done by making the rounded ends into smaller tube shapes. Sew one end as in step 3 and at the other end of the same piece make a hem casing to pull a cord or a tape through.When the pad is inserted tighten the cord or tape, secure this by knotting or sewing. Then cover the end with a button, tassel or bow.
Enjoy making your bolster covers and cushion pads..
Return from Bolster Covers to Cushion Covers
Return from Making Bolster Covers to Sewing Instructions
Affiliate offers
Please take care with any soft furnishing that it does not come into contact with any heat source.
If you have found an error on this page or want some more information on sewing cushions.
Please contact me . Thank you