Tumbling blocks Ribbon Weave
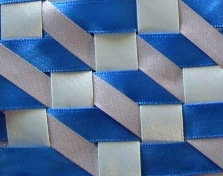
Using ribbon in a tumbling blocks style weave gives a beautiful and striking effect. This is a type of patchwork with ribbons instead of material.
The way the ribbons are placed together just seem to make this design jump right out. This weave can be used to be the front of a cushion or have a small section as an insert in a larger cushion. This would need to have a border around it.
The ribbons are pinned to a soft background like a cork board while the weaving is taking place. This makes sure the ribbons are kept in the right direction and you like the finished look. When the weave is finished then fusible or iron on interfacing is used and the weave is then "fixed" by heating the interfacing. It will be difficult to take apart once the interfacing has been added.
Thinking about the complexity of the weave it may be better to place the fusible interfacing underneath and then pin and weave the ribbons on top of it. Then everything would be ready to iron without too much trouble.
How to do the Tumbling Blocks Weave.
You will need three different colours of ribbon, either a lighter and darker shade of the same colour and the third will be a paler shade of the chosen colour, cream or white shade for the diagonal stripe.
The two main colours should be 1/2 inch (1.3cms) wide.
The cream/white/or paler shade should be 3/8 inch (1.0cms) wide.
Place and pin the lighter coloured ribbon, cut to the length you have chosen, onto some sort of soft background such as a cork noticeboard, a thicker fabric , a foam block, or even another cushions you may have. This is known as the warp of the weave.
The strips should be side by side with no gaps between them.
Cut strips of the darker shade of ribbon to fit across the paler strips. This is known as the weft of the weave.
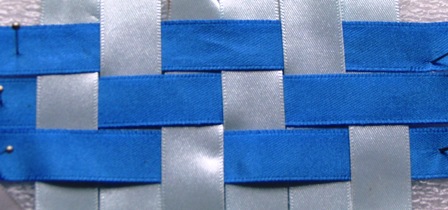
The weave is made up of 3 rows as follows always starting at the left hand side working to the right hand side.
Row 1 - The darker ribbon (weft) goes over 1, under 1, over 2, under 1, over 2 , and so on of the lighter ribbon (warp). Continue until you have threaded the first row to your size.
Row 2 - The darker ribbon (weft) goes under 1, over 2, under 1, over 2 of the warp (lighter ribbon) to the end.
Row 3 - The darker ribbon (weft) goes over 2, under 1, over 2, under 1 of the warp (lighter ribbon) to the end.
The three rows should look like the above picture. Carry on repeating threading these rows until your cushion square is finished.
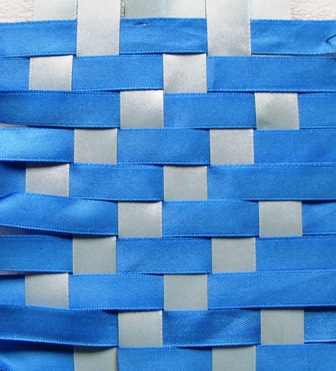
The next stage is to thread the diagonal paler shade through the weave. I had never done this and it took me a long time to actually see where it had to go.
The basic weave is that the diagonal goes under 2 warp (up and down lighter ribbon) and over 2 weft ( side to side darker ribbon). Start at the bottom right hand corner and work towards the top left hand corner.
Weave the left side before tackling the right side, as all the lengths of diagonal ribbon will be different it is best to trim the ribbon after it has been threaded through.
The diagonal ribbon will be seen where the two weft ribbons are above each other as highlighted in the above picture. Also in the picture the bottom left hand side has got the diagonal ribbon showing the tumbling blocks whereas the middle and top has still to be done. Once you can see where the diagonal ribbon has to go it will be easier to complete.
The cushion would then need a back. fastenings and a pad to complete.
Enjoy your weaving....
Affiliate offers
Please take care with any soft furnishing that it does not come into contact with any heat source.
If you have found an error on this page or want some more information on sewing cushions.
Please contact me . Thank you