Making patchwork quilts with different types of blocks.
Different types of patchwork blocks can be used in making patchwork quilts and look very attractive when the blocks are mixed. They could all match by using the same colours of fabric.
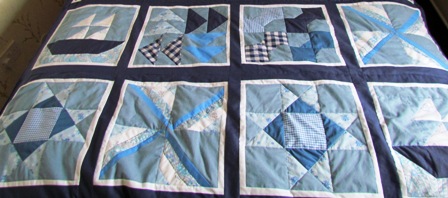
The types of blocks that can be used are Ohio Star, Roman pin wheel, Dutchman's puzzle, Bow Tie, and Sail Boat are just a few. There are many more different blocks as well as ones that you can make up yourself using different shapes.
The only one to be wary of using with other blocks is the Log Cabin patchwork block as when I was making my quilt I found that this one was larger than the others. Other quilts were made just using this patchwork block.
Making all the different blocks has been difficult and you will need a bit more patience to get the finished quilt.
To actually do quilting is another website altogether as all the parts of the cushions or quilts are sewn in a special designs and ways. This site is showing a version of getting to the finished quilt.
Points to remember when making patchwork quilts from different blocks.
- The cutting out and sewing need to be kept accurate and square so that all the blocks end up being the same size.
- Seams may need to be increased or decreased slightly to help with this.
- Draw a pattern to show how the blocks are to be sewn together or lay out your blocks to help.
- Decide how many blocks will be needed to make the quilt, I used four blocks wide and six blocks in length and this was just about wide enough for a double bed but more that enough length.
Some other steps to consider
The first steps to decide when looking at all your patchwork blocks lying there ready to be made into a quilt is
- Choosing the colour for the backing fabric either by picking out one from the block fabric or a contrasting colour. ( I seemed to have a lot of navy so I picked that colour as it was also a colour I used in some of the blocks). I also used the same fabric as a divider in between the different block and rows.
- Deciding whether to add a border to the blocks. ( I decided to have a thin border 1 inch (2.5cms) around each block. This was to give a break between the same coloured fabric used at the edge of some blocks and the divider.) I thought this would show the different blocks clearly.
Making the quilt
- Cut borders and sew around the different types of blocks if desired. Attach opposite sides first, press and then sew the remaining borders in place.
- If using dividing strips between the blocks cut and sew to the border of the blocks sewing opposite sides first, press and then sew remaining sides.
- Following your pattern as to the position of the blocks attach them in sequence making sure that the seams match. Pressing at each stage.
- When all the blocks are sewn together attach the polyester wadding and backing fabric like that in making a quillow.
- Top stitch to secure the blocks in place, the more top stitching done the less likely the fabric is to separate. The type I use the most is gutter top stitching where the seam is followed.
Making patchwork quilts can take quite a long time as the top stitching is quite difficult. Now that you have made your quilt you can see how good it looks.
Return from Making patchwork quilts back to What is Patchwork
Return back to Cushions and More
Affiliate offers
Please take care with any soft furnishing that it does not come into contact with any heat source.
If you have found an error on this page or want some more information on sewing cushions.
Please contact me . Thank you